Stats

Showing posts with label System Tools. Show all posts

Sunday, December 21, 2014

Get Secret Information from Your Android.

Generally these codes are hidden from users to avoid misuse, faults or possible damage to your android device.
These codes are used by experts and many other users to troubleshoot the device. The narmal Settings menu is not enough. There are few secret codes too.

Note: Few codes do not work on all Android version.

1. To get complete information about your Android.
This gives you information about your phone and battery including, Phone information, Battery information, Battery history and Usage statistics.
Dial this number/code: *#*#4636#*#*

2. Factory data reset
This code will give you a prompt that will have the 'Reset phone' button. If you don't want to reset, then press cancel.
Use: *#*#7780#*#*

3. Format Android Phone
This code formats your Android device. The code is used in order to perform a factory format on your device and removes all settings and files, including the internal memory storage. It reinstall's the phone's firmware and there is no way to cancel this operation, except removing the battery from the device.
Use code: *2767*3855#

4. Phone Camera Update

This code will give you information about the camera on your phone. The following four menus are shown,
Using the 'Update camera firmware in image' option has been known to make your camera stop working, so it is advisable to not choose that option.
- Update camera firmware in image
- Update camera firmware in SD card
- Camera firmware version
- Firmware update count
Use code: *#*#34971539#*#*

5. End Call/Power

This code allows you to manipulate the function of the power on/off/lock button on your smartphone. Instead of getting the options for silent mode etc. you can choose to make it turn off the power directly.
Use Code: *#*#7594#*#*

6. File Copy for Creating Backup
This is a very useful code that lets you backup your images, media files, video, voice memo etc. You will get a file copy screen allowing you to backup images.
Number/code: *#*#273283*255*663282*#*#*

7. Service Mode
The idea behind entering the Service Mode is that you can run various tests on your device using this.
Number/code: *#*#197328640#*#*

8. WLAN, GPS and Bluetooth Test Codes

There are many codes that you can use for this one.

*#*#232338#*#*   (Shows WiFi MAC Address)

*#*#1472365#*#*  (GPS Test)

*#*#1575#*#*  (Another GPS Test)

*#*#232331#*#*  (Bluetooth Test)

*#*#232337#*#  (Shows Bluetooth Device Address)

9. Get Firmware version information
This codes provide the firmware information about your device.

*#*#4986*2650468#*#*  (PDA, Phone, H/W, RFCallDate)

*#*#1234#*#*  (PDA and Phone)

*#*#1111#*#*  (FTA SW Version)

*#*#2222#*#*  (FTA HW Version)

*#*#44336#*#*  (PDA, Phone, CSC, Build Time, Changelist number)

10. To launch various Factory Tests
There are many other factory tests that you can run on a smartphone.

*#*#0283#*#*  (Packet Loopback)

*#*#0*#*#*  (LCD test)

*#*#0673#*#* OR *#*#0289#*#*  (Melody test)

*#*#0842#*#*  (Device test (Vibration test and BackLight test))

*#*#2663#*#*  (Touch screen version)

*#*#2664#*#*  (Touch screen test)

*#*#0588#*#*  (Proximity sensor test)

*#*#3264#*#*  (RAM version)

Computer Ports (Basic).

 In computer, the term port can refer either to the Physical or Logical(virtual) connection points.

Physical ports allow connecting cables to computers, routers, modems and other peripheral devices.
Several different types of physical ports are available on computer. Such as Ethernet ports, USB ports, Serial ports, VGA ports, HDMI ports, PS2 Ports, etc...


Logical(virtual) ports are part of TCP/IP networking. These ports allow software applications to share hardware resources without interfering with each other. Computers and routers automatically manage network traffic via their virtual ports.
Using a network Network we can control over the flow of traffic on each virtual port for security purposes.

Saturday, December 20, 2014

Recover Wireless Password, Already Connected to your Windows.

Press Win + R keyboard combination to open "Run", type "ncpa.cpl" in the run box, and then press Enter key.


Now you will see all the network adapters in your computer, Right-click on the Wireless Card and select Properties.

Then click on the "Security" tab present at the top of the window.

Now, check the "Show characters" check-box to see your password.

Enjoy! and stay connected.

Friday, December 19, 2014

Create bootable USB drives.

Rufus is a utility that helps format and create bootable USB flash drives, such as USB keys/pen-drives, memory sticks, etc. Is is simple, fast and too small in size. And the best thing about it is it doesn't require installation.

Lets see how to create a bootable USB drive using Rufus :-

1- Download Rufus, from HERE (Official site).
2- Now connect a USB drive to your Computer. (Take backup of the drive as, Rufus will format the drive.)
3- Execute the downloaded file. You will find the below screen.


4- Select the USB drive from the "Device" drop-down menu.

5- Now Check "Create a bootable disk using" and select "ISO image" from drop-down menu.

6- Now click on the Disk Drive icon to browse the ISO image, and click on Start button.

7- As the bootable USB is been created it will display "DONE" at the status bar.

Your bootable USB is Successfully created.

Enjoy and stay connected.

Thursday, December 18, 2014

Enable and Disable Built-in Administrator Account in Windows 8

Enable Or Disable Built-in Administrator Account

Enabling Built-In Administrator account

Firstly, you need to open the command prompt with administrator rights. Just press the Windows key to open the metro interface and then type command prompt in the search box.

Search for CMD 

Next, right-click on command prompt and Run it as administrator.

Run as Administrator 

Copy this code net user administrator /active:yes and paste it in the command prompt. Then, press Enter to enable your built-in administrator account.

Enable Command Prompt 

Once you’re done, you can access your built-in administrator account by logging off your current account anytime.

Login built-in administrator account 

Do take note that you can’t change the name of the built-in administrator account; it will always stay as Administrator.


Disabling Built-in Administrator Account

Again, you have to open the command prompt with administrator rights. So, press the Windows key to open the metro interface and then and type command prompt in the search box.

Search for CMD 

Next, right-click on command prompt and Run it as administrator.

Run as administrator 

Open the command prompt with administrator right and type this code net user administrator /active:no in the command prompt. Then, press Enter to disable your built-in administrator account.
Disable Command Prompt 

Windows Shortcuts


Getting familiar with keyboard shortcuts not only help you get the work done faster, but also more efficient. If your daily job rely heavily on using Windows, here are some 100+ Windows Keyboard Shortcuts you might want to check out. If there’s any nifty shortcuts we have missed, appreciate a heads up.

The General Shortcuts
CTRL+C
Copy


CTRL+X
Cut


CTRL+V
Paste


CTRL+Z
Undo


Delete
Delete


Shift+Delete
Delete the selected item permanently without placing the item in the Recycle Bin


CTRLwhile dragging an item
Copy the selected item


CTRL+Shift while dragging an item
Create a shortcut to the selected item


F2key
Rename the selected item


CTRL+RIGHT ARROW
Move the insertion point to the beginning of the next word


CTRL+LEFT ARROW
Move the insertion point to the beginning of the previous word


CTRL+DOWN ARROW
Move the insertion point to the beginning of the next paragraph


CTRL+UP ARROW
Move the insertion point to the beginning of the previous paragraph


CTRL+Shift with any of the arrow keys
Highlight a block of text


Shiftwith any of the arrow keys
Select more than one item in a window or on the desktop, or select text in a document


CTRL+A
Select all


F3key
Search for a file or a folder


Alt+Enter
View the properties for the selected item


Alt+F4
Close the active item, or quit the active program


Alt+Enter
Display the properties of the selected object


Alt+Spacebar
Open the shortcut menu for the active window


CTRL+F4
Close the active document in programs that enable you to have multiple documents open simultaneously


Alt+Tab
Switch between the open items


Alt+ESC
Cycle through items in the order that they had been opened


F6key
Cycle through the screen elements in a window or on the desktop


F4key
Display the Address bar list in My Computer or Windows Explorer


Shift+F10
Display the shortcut menu for the selected item


Alt+Spacebar
Display the System menu for the active window


CTRL+ESC
Display the Start menu


Alt+Underlined letter in a menu name
Display the corresponding menu


Underlined letter in a command name on an open menu
Perform the corresponding command


F10key
Activate the menu bar in the active program


RIGHT ARROW
Open the next menu to the right, or open a submenu


LEFT ARROW
Open the next menu to the left, or close a submenu


F5key
Update the active window


Backspace
View the folder one level up in My Computer or Windows Explorer


ESC
Cancel the current task


Shiftwhen you insert a CD-ROM into the CD-ROM drive
Prevent the CD-ROM from automatically playing


Dialog Box Keyboard Shortcuts
CTRL+Tab
Move forward through the tabs


CTRL+Shift+Tab
Move backward through the tabs


Tab
Move forward through the options


Shift+Tab
Move backward through the options


Alt+Underlined letter
Perform the corresponding command or select the corresponding option


Enter
Perform the command for the active option or button


Spacebar
Select or clear the check box if the active option is a check box


Arrow keys
Select a button if the active option is a group of option buttons


F1key
Display Help


F4key
Display the items in the active list


Backspace
Open a folder one level up if a folder is selected in the Save As or Open dialog box


Microsoft Natural Keyboard Shortcuts
Win
Display or hide the Start menu


Win+BREAK
Display the System Properties dialog box


Win+D
Display the desktop


Win+M
Minimize all of the windows


Win+Shift+M
Restore the minimized windows


Win+E
Open My Computer


Win+F
Search for a file or a folder


CTRL+Win+F
Search for computers


Win+F1
Display Windows Help


Win+ L
Lock the keyboard


Win+R
Open the Run dialog box


Win+U
Open Utility Manager


Accessibility Keyboard Shortcuts
Right Shift for eight seconds
Switch FilterKeys either on or off


Left Alt+left Shift+PRINT SCREEN
Switch High Contrast either on or off


Left Alt+left Shift+NUM LOCK
Switch the MouseKeys either on or off


Shiftfive times
Switch the StickyKeys either on or off


NUM LOCKfor five seconds
Switch the ToggleKeys either on or off


Win+U
Open Utility Manager


Windows Explorer Keyboard Shortcuts
END
Display the bottom of the active window


HOME
Display the top of the active window


NUM LOCK+*
Display all of the subfolders that are under the selected folder


NUM LOCK++
Display the contents of the selected folder


NUM LOCK+-
Collapse the selected folder


LEFT ARROW
Collapse the current selection if it is expanded, or select the parent folder


RIGHT ARROW
Display the current selection if it is collapsed, or select the first subfolder


Shortcut Keys for Character Map
After you double-click a character on the grid of characters, you can move through the grid by using the keyboard shortcuts:
RIGHT ARROW
Move to the right or to the beginning of the next line


LEFT ARROW
Move to the left or to the end of the previous line


UP ARROW
Move up one row


DOWN ARROW
Move down one row


PAGE UP
Move up one screen at a time


PAGE DOWN
Move down one screen at a time


HOME
Move to the beginning of the line


END
Move to the end of the line


CTRL+HOME
Move to the first character


CTRL+END
Move to the last character


Spacebar
Switch between Enlarged and Nor mal mode when a character is selected


Microsoft Management Console
MMC

 Main Window Keyboard Shortcuts
CTRL+O
Open a saved console


CTRL+N
Open a new console


CTRL+S
Save the open console


CTRL+M
Add or remove a console item


CTRL+W
Close window/tab


F5key
Update the content of all console windows


Alt+Spacebar
Display the MMC window menu


Alt+F4
Close the console


Alt+A
Display the Action menu


Alt+V
Display the View menu


Alt+F
Display the File menu


Alt+O
Display the Favorites menu


MMC Console Window Keyboard Shortcuts
CTRL+P
Print the current page or active pane


Alt+-
Display the window menu for the active console window


Shift+F10
Display the Action shortcut menu for the selected item


F1key
Open the Help topic, if any, for the selected item


F5key
Update the content of all console windows


CTRL+F10
Maximize the active console window


CTRL+F5
Restore the active console window


Alt+Enter
Display the Properties dialog box, if any, for the selected item


F2key
Rename the selected item


CTRL+F4
Close the active console window. When a console has only one console window, this shortcut closes the console


Remote Desktop Connection Navigation
CTRL+Alt+END
Open the m*cro$oft Windows NT Security dialog box


Alt+PAGE UP
Switch between programs from left to right


Alt+PAGE DOWN
Switch between programs from right to left


Alt+INSERT
Cycle through the programs in most recently used order


Alt+HOME
Display the Start menu


CTRL+Alt+BREAK
Switch the client computer between a window and a full screen


Alt+Delete
Display the Windows menu


CTRL+Alt+-
Place a snapshot of the active window in the client on the Terminal server clipboard and provide the same functionality as pressing PRINT SCREEN on a local computer.


CTRL+Alt++
Place a snapshot of the entire client window area on the Terminal server clipboard and provide the same functionality as pressing Alt+PRINT SCREEN on a local computer.


Internet Explorer navigation
CTRL+B
Open the Organize Favorites dialog box


CTRL+E
Open the Search bar


CTRL+F
Start the Find utility


CTRL+H
Open the History bar


CTRL+I
Open the Favorites bar


CTRL+L
Open the Open dialog box


CTRL+N
Start another instance of the browser with the same Web address


CTRL+O
Open the Open dialog box, the same as CTRL+L


CTRL+P
Open the Print dialog box


CTRL+R
Update the current Web page


CTRL+W
Close the current window

Power Of Run

Creating Your Own Run Commands.
If you are like me, you will use a few programs very frequently. One way to make them
start faster is to give them their own Run command:

1. Win+R to open the Run dialog.
2. Enter %windir% to open the Windows directory.
3. Alt+F > W > S to open the File menu, choose the New menu item, then the Shortcut menu item.
4. Go through the wizard to create a shortcut to the desired program.
5. The name you give the shortcut is what you type in the Run dialog to start the program.

Wednesday, December 17, 2014

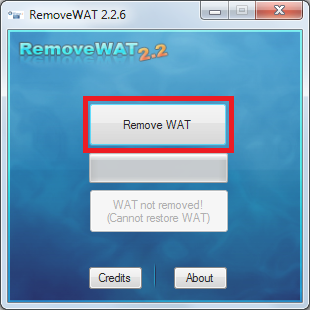
Activate Windows 7 (Without key), Using WAT remover 2.2.6

  Activate your windows 7 life time for free. Activate windows 7 without any activation key. This tool help you to get life time genuine windows 7.

The tool is WAT Remover 2.2.6 which is very easy to use and to activate windows without having any serial or product key.
You don't have to crack windows to make genuine. WAT stands for Windows Activation Technology. Microsoft use it to trace the Windows Activation Status.

How to use WAT Remover Tools :-

=> First Download WAT Remove 2.2.6 from below link.
 http://1drv.ms/1BVsVa6

=> Now turn off your all Protection of your Antivirus application installed on your system. As it might delete the tool as few antivirus suspect it. But its not a virus.

=> After turn off antivirus now extract Zip of WAT Remover.

=> Now Run WAT Remover tool as administration.

=> Click on Remove WAT and wait for few moment.


 => If it ask for restart windows then click OK to restart windows. After restart your Windows 7 Activation is Successfully Done. Windows will never ask again for activate to make it genuine.

Now you can turn on protection of your antivirus. Hope this tools is helpful for all of us, who want a genuine windows 7 without having any problem for lifetime. And now you can also update windows from Microsoft directly without any problem.

Tuesday, December 16, 2014

Take Back Up Of Mozilla Thunderbird with 4 Simple Steps.


 With a 4 simple steps, you can backup your emails.

1. Close Mozilla Thunderbird, Make sure your Thunderbird mail client is not running.

2. Go to the "Run" menu.This can be accessible by pressing the Start key, and "R" at the same time. In the "Run" screen, type in "%appdata%", (without the quotes), and click "OK".

3. In AppData folder, locate the folder called "Thunderbird".Right click on the "Thunderbird" folder, and copy and paste it to a safe location.


4. Congratulations, you have successfully backed up your emails in Thunderbird.


To know how to restore Thunderbird mail backup click  Here  .

Saturday, December 13, 2014

ERD Commander -- Download


Emergency Repair Disk (ERD), also referred as a System Recovery disk. It has both graphical environment and a command-line console. The command-line console can be opened by clicking the Command Prompt option in the System Recovery Options menu. You can access any Windows client or Server file system, which includes FAT, FAT32, and NTFS.

The following table lists some of the problems that can be solved using the utilities and wizards that are provided in the Microsoft Diagnostics and Recovery Tool set.

Task Solution
Edit the Registry The ERD Registry Editor utility on the MSDaRT Tools menu provides information about the registry that can help you repair a system.
Regain access to a system The Locksmith wizard can be used to list the local user accounts and change passwords.
Diagnose a system failure The Crash Analyzer can be used to diagnose the cause of a system crash and identify the driver that caused the failure.
Salvage and repair partitions or volumes The Disk Commander can be used to salvage or repair partitions, or volumes.
Recover deleted files The File Restore utility can be used to find and restore deleted files from any supported Windows-based file system.
Erase disks or volumes The Disk Wipe utility can be used to erase disks or volumes.
Search for particular files The Search utility allows you to restrict the scope of your search by specifying part of the name, search location, estimated size of the file, or the time when the file was modified.
Browse drives The Explorer utility allows you to browse folders and files that are stored on various drives.
Perform administrative tasks to manage the computer The Computer Management utility provides recovery tools to help you:
  • Disable problematic drivers or services.
  • View event logs.
  • Partition and format hard disk drives.
  • Get information about Autoruns.
  • Get information about the computer.
Configure TCP/IP The TCP/IP Config utility helps you to display and set a TCP/IP configuration.
Uninstall Windows hot fixes and service packs Hot fix Uninstall can be used to remove Windows hot fixes or service packs from a system that cannot be started.
Check and repair system files The SFC Scan utility helps you check system files and repair any that are corrupt or missing.
Use an anti-malware tool The Standalone System Sweeper utility helps detect malware or other unwanted software, and alerts you to potential risks.

You may download  Emergency Repair Disk (ERD),  for free form below :- 
https://onedrive.live.com/redir?resid=6155BF49B6ABB47A!2709&authkey=!ABPJTegF0uc30gE&ithint=folder%2c
ERD 5.0 (for Win XP)
https://onedrive.live.com/redir?resid=6155BF49B6ABB47A!2709&authkey=!ABPJTegF0uc30gE&ithint=folder%2c
ERD 6.0 (for Win Vista)
https://onedrive.live.com/redir?resid=6155BF49B6ABB47A!2710&authkey=!AD2dhz4Hyp2yDCw&ithint=folder%2c
ERD 6.5 (for Win 7)
You may also visit :-

Sponsors

LMN Entertainment World

LMN Entertainment World
Free Download latest Bollywood Music Videos and Songs in High Definition HD Quality.

Sponsors

Powered by Blogger.